Friday, 19 July 2013

CRM 2011 - Custom Lookup Example

Dynamically changing the way a CRM Lookup field works is something that most developers come across, especially when they want to:
  1. Filter the records that are displayed in the Lookup window
  2. Change the columns displayed in the Lookup window
  3. Change the entity type
Regardless of the requirement, the only way to customize a CRM Lookup field is to use client-side JScript/JavaScript.

The steps to customize a CRM Lookup field are as follows:

  1. function CustomLookup() {
  2.  
  3.     //1. Random Guid
  4.     var viewId = "{1BFB2B35-B07C-44D1-868D-258DEEAB88E2}";
  5.  
  6.     //2. The Display Name of the View
  7.     var viewDisplayName = "My Accounts";
  8.  
  9.     //3. The Entity Type that you want the Lookup to us
  10.     var entityName = "account";                             e
  11.  
  12.     //4. The FetchXml Query which is executed to return the data to the Lookup window
  13.     var cFetchXml =
  14.                 "<fetch version='1.0' output-format='xml-platform' mapping='logical' distinct='false'>" +
  15.                 "<entity name='" + entityName + "'>" +
  16.                     "<attribute name='name' />" +
  17.                     "<attribute name='accountid' />" +
  18.                     "<order attribute='name' descending='false' />" +
  19.                     "<filter type='and'>" +
  20.                         "<condition attribute='name' operator='in' >" +
  21.                             "<value>Microsoft</value>" +
  22.                             "<value>Salesforce</value>" +
  23.                             "<value>Oracle</value>" +
  24.                         "</condition>" +
  25.                     "</filter>" +
  26.                  "</entity>" +
  27.                 "</fetch>";
  28.  
  29.     //5. Layout - this section defines which columns are displayed, width of the column etc
  30.     var cGridLayout =
  31.         "<grid name='resultset' object='1' jump='name' select='1' icon='1' preview='1'>" +
  32.             "<row name='result' id='accountid'>" +
  33.                 "<cell name='name' width='100' />" +
  34.             "</row>" +
  35.         "</grid>";
  36.     
  37.     $("#lookupControlId").attr("disableViewPicker", "0");
  38.  
  39.     //6. Add the Custom Lookup
  40.     Xrm.Page.getControl("lookupControlId").addCustomView(viewId,
  41.         entityName,
  42.         viewDisplayName,
  43.         cFetchXml,
  44.         cGridLayout,
  45.         true);
  46.  
  47.     $("#lookupControlId").attr("disableViewPicker", "1");
  48. }


Tuesday, 18 June 2013

CRM 2011 - Reports created using Report Wizard not Working?

Some of you may have experienced an issue where FetchXml based reports created using the CRM Report Wizard don't work, typically the reports will fail with an rsProcessingAborted error.

Reporting logs will show an error similar too:

Microsoft.Crm.CrmException: An unexpected error occurred.
System.ServiceModel.Security.SecurityNegotiationException: A call to SSPI failed, see inner exception.
System.Security.Authentication.AuthenticationException: A call to SSPI failed, see inner exception.
System.ComponentModel.Win32Exception: The target principal name is incorrect

The cause of this issue is that the SPN's have not been set correctly. FetchXML queries require a HTTP SPN to communicate to the server. The MS CRM app pool is using a domain service account, and the query will be looking for an HTTP SPN that does not exist.

Solution

To best describe how to resolve this, the scenario we will use is:

Load Balanced Environment
  • Load Balanced URL - https://mycrm.domain.com/MyOrg

CRM Application Servers
  • Windows Server 2008 - Machine Name: WINSVRCRM1
  • Windows Server 2008 - Machine Name: WINSVRCRM2
CRM Application Pool Identity
  • Domain\CrmServiceAccount
The SPNs you need to set based on this configuration is as follows:
  • HTTP/mycrm
  • HTTP/mycrm.domain.com
  • HTTP/WINSVRCRM1
  • HTTP/WINSVRCRM1.domain.com
  • HTTP/WINSVRCRM2
  • HTTP/WINSVRCRM2.domain.com
Additionally you will want to add SPN's for the load balancer.

Add SPN Command
To add a new SPN entry, open a command prompt with admin privilages and use the following command replacing with the appropriate values:

setspn -a HTTP/<ServerName> <ServiceAccountDomain>\<ServiceAccount>

Monday, 13 May 2013

CRM 2011 - JScript Error on Form Load (Errors On Page)

There are many reasons and causes of client side JScript errors, any line of code that has insufficient exception handling can result in an error message, for example when you are trying to call a function onload that doesn't exist. As you can see below, it's clear what the error is.
However there are scripting errors that are much harder to identify, which are displayed via the "Microsoft Dynamics CRM has encountered an error." dialog. Typically you will also get a "Errors on page" at the bottom left hand corner of your IE window:

Example Error
A recent example is where a colleague was experiencing errors after installing Rollup 12 and 13. The data being sent to Microsoft is displayed below:
Data that will be sent to Microsoft
  1. <CrmScriptErrorReport>
  2.   <ReportVersion>1.0</ReportVersion>
  3.   <ScriptErrorDetails>
  4.     <Message>Syntax error</Message>
  5.     <Line>306073745</Line>
  6.     <URL>/userdefined/edit.aspx?_gridType=4200&etc=4207&id=%7b998C4134-EAB3-E211-9A96-005056BC08B2%7d&pagemode=iframe&preloadcache=1368438373440&rskey=68511477</URL>
  7.     <PageURL>/userdefined/edit.aspx?_gridType=4200&etc=4207&id=%7b998C4134-EAB3-E211-9A96-005056BC08B2%7d&pagemode=iframe&preloadcache=1368438373440&rskey=68511477</PageURL>
  8.     <Function>anonymous(container,scriptContent,id){if(IsNull(container))container=this.get_headElement();var$v_0=container.ownerDocument.createElement("script");container.appendChild($v_0);!isNullOrEmptyString(id)&&$v_0.setAttribute("id",id);$v_0.setAttribute("type","</Function>
  9.     <CallStack>
  10.       <Function>anonymous(container,scriptContent,id){if(IsNull(container))container=this.get_headElement();var$v_0=container.ownerDocument.createElement("script");container.appendChild($v_0);!isNullOrEmptyString(id)&&$v_0.setAttribute("id",id);$v_0.setAttribute("type","text/javascript");$v_0.text=scriptContent}</Function>
  11.       <Function>anonymous(container,scriptFile){var$v_0=scriptFile.toString();if(this.$4V_1($v_0))return;var$v_1=this.fetchExternalFile($v_0);this.addIncludeInline(container,$v_1,$v_0)}</Function>
  12.       <Function>anonymous(uri,useInlineScripts,scriptLoaded){if(uri.get_path().toUpperCase()==="/_STATIC/_COMMON/SCRIPTS/GLOBAL.JS")uri=Mscrm.CrmUri.create("/_common/global.ashx");if(useInlineScripts)Mscrm.CrmHeader.get_scriptLoader().addIncludeExternalSync(null,uri);elseMscrm.CrmHeader.get_scriptLoader().addIncludeExternalCallback(null,uri,scriptLoaded)}</Function>
  13.       <Function>
  14.         anonymous($p0,$p1,$p2,$p3){Mscrm.CrmHeader.setScriptFile(Mscrm.CrmUri.create($p1),true);for(var$v_0=window,$v_1=$p0.split("."),$v_2=0;$v_2<$v_1.length;$v_2++)if($v_0)$v_0=$v_0=""[$v_1=""[$v_2=""]];if=""(!IsNull=""($v_0="")&&typeof$v_0===Mscrm.TypeNames.functionType){var$v_3=this.$CN_1($p2,$p3);return$v_0.apply(null,$v_3)}returnnull}
  15.       </Function>
  16.       <Function>anonymous($p0,$p1){var$v_0=this.$9w_1($p0.FunctionName,$p0.Library,$p0.Parameters,null);if(!IsNull($v_0)&&typeof$v_0===Mscrm.TypeNames.booleanType)return$v_0;elsereturn$p1}</Function>
  17.       <Function>anonymous($p0){if(IsNull($p0))returnfalse;var$v_0=$p0.DefaultValue;switch($p0.RuleType){case8:$v_0=this.$Cz_1($p0);break;case1:$v_0=this.$D2_1($p0);break;case7:$v_0=this.$D3_1($p0,$p0.DefaultValue);break;case4:$v_0=this.$D4_1($p0,$p0.DefaultValue);break;case16:$v_0=this.$D5_1($p0);break;case2:$v_0=this.$D6_1($p0);break;case10:$v_0=this.$D7_1($p0);break;case19:$v_0=this.$D8_1($p0,$p0.DefaultValue);break;case17:$v_0=this.$D9_1($p0);break;case12:$v_0=this.$DA_1($p0);break;case6:$v_0=this.$D1_1($p0,$p0.DefaultValue);break;case5:$v_0=this.$DB_1($p0,$p0.DefaultValue);break;case11:$v_0=this.$DC_1($p0);break;case3:$v_0=this.$DD_1($p0,$p0.DefaultValue);break}if(IsNull($v_0))$v_0=IsNull($p0.DefaultValue)?true:$p0.DefaultValue;if(!IsNull($p0.InvertResult)&&$p0.InvertResult)$v_0=!$v_0;return$v_0}</Function>
  18.       <Function>
  19.         anonymous($p0,$p1){var$v_0=this.getEnableRuleDefinition($p0,$p1);if(IsNull($v_0)||IsNull($v_0.Rules)||!$v_0.Rules.length)returntrue;for(var$v_1=true,$v_2=0;$v_1&&$v_2<$v_0.Rules.length;$v_2++)$v_1=$"v_1"&&this.$9v_1($v_0.Rules[$v_2]);return$v_1}
  20.       </Function>
  21.       <Function>
  22.         anonymous($p0,$p1){if(IsNull(Mscrm.RibbonCommands.enableRules))returntrue;var$v_0=this.getCommandDefinition($p0,$p1);if(IsNull($v_0))returntrue;var$v_1=$v_0.EnableRules;if(IsNull($v_1))returntrue;for(var$v_2=true,$v_3=0;$v_2&&$v_3<$v_1.length;$v_3++){var$v_4=$"v_1"[$v_3=""];if=""(IsNull=""($v_4="")||!$v_4.length="")continue;$v_2=$"v_2"&&this.$D0_1($v_4,$p1)}return$v_2}
  23.       </Function>
  24.       <Function>anonymous($p0){if(!this.$5T_1)returnfalse;var$v_0=this.parseCommandFromRibbon($p0),$v_1=this.$CH_1($v_0.command,$v_0.entityLogicalName);if($v_1&&!IsNull(this.$H_1.$5A_2[$p0]))$v_1=Mscrm.RibbonNavigationModel.shouldContextGroupBeShown($v_0,this.$H_1);elseif($v_1&&!IsNull(this.$H_1.$28_2[$p0]))$v_1=Mscrm.RibbonNavigationModel.shouldTabBeShown($p0,$v_0,this.$H_1);if(!IsNull(this.$H_1.$28_2[$p0]))this.$H_1.$28_2[$p0]=$v_1;return$v_1}</Function>
  25.     </CallStack>
  26.   </ScriptErrorDetails>
  27.   <ClientInformation>
  28.     <BrowserUserAgent>Mozilla/4.0 (compatible; MSIE 8.0; Windows NT 6.1; WOW64; Trident/4.0; SLCC2; .NET CLR 2.0.50727; .NET CLR 3.5.30729; .NET CLR 3.0.30729; .NET4.0C; .NET4.0E)</BrowserUserAgent>
  29.     <BrowserLanguage>en-us</BrowserLanguage>
  30.     <SystemLanguage>en-gb</SystemLanguage>
  31.     <UserLanguage>en-gb</UserLanguage>
  32.     <ScreenResolution>1280x1024</ScreenResolution>
  33.     <ClientName>Web</ClientName>
  34.     <ClientTime>2013-05-13T10:46:58</ClientTime>
  35.   </ClientInformation>
  36.   <ServerInformation>
  37.     <OrgLanguage>1033</OrgLanguage>
  38.     <OrgCulture>1033</OrgCulture>
  39.     <UserLanguage>1033</UserLanguage>
  40.     <UserCulture>1033</UserCulture>
  41.     <OrgID>{53547D16-0D2B-4BB4-A05D-3451C1C375D6}</OrgID>
  42.     <UserID>{54CDC85A-52B9-E211-891A-005056BC2521}</UserID>
  43.     <CRMVersion>5.0.9690.3448</CRMVersion>
  44.   </ServerInformation>
  45. </CrmScriptErrorReport>

The Issue
After analyzing the call stack, it became apparent that the issue was originating from the Ribbon, relating to enable rules which rely on JScript functions to determine if the users has access to that functionality.

It was pretty obvious after looking at the Ribbon XML, the issue was that their was a missing $webresource prefix from the library paths.

Missing $webresource
  1. <EnableRule Id="Imp.Form.Task.DataGroupButtons.EnableRule">
  2.   <CustomRule Library="KSR/Script/Common/AccessLibrary.js" FunctionName="KSR.Common.hasUserITSRole" InvertResult="true">
  3.   </CustomRule>
  4. </EnableRule>
  5. <EnableRule Id="Imp.Form.Task.RestrictAccess.EnableRule">
  6.   <CustomRule Library="KSR/Script/Common/AccessLibrary.js" FunctionName="KSR.Common.enableRestrictAccessButton">
  7.   </CustomRule>
  8. </EnableRule>

The Fix
With the $webresource
  1. <EnableRule Id="Imp.Form.Task.DataGroupButtons.EnableRule">
  2.   <CustomRule Library="$webresource:KSR/Script/Common/AccessLibrary.js" FunctionName="KSR.Common.hasUserITSRole" InvertResult="true">
  3.   </CustomRule>
  4. </EnableRule>
  5. <EnableRule Id="Imp.Form.Task.RestrictAccess.EnableRule">
  6.   <CustomRule Library="$webresource:KSR/Script/Common/AccessLibrary.js" FunctionName="KSR.Common.enableRestrictAccessButton">
  7.   </CustomRule>
  8. </EnableRule>

Hope this helps :)

Thursday, 9 May 2013

How to get OptionSet values using SQL?

Obtaining a list of option values for a MS CRM 2011 OptionSet is pretty simple, especially if you plan to do this via the CRM Web service API. However a requirement may arise where you may want to do this using direct SQL against the Organization database.

Example Background

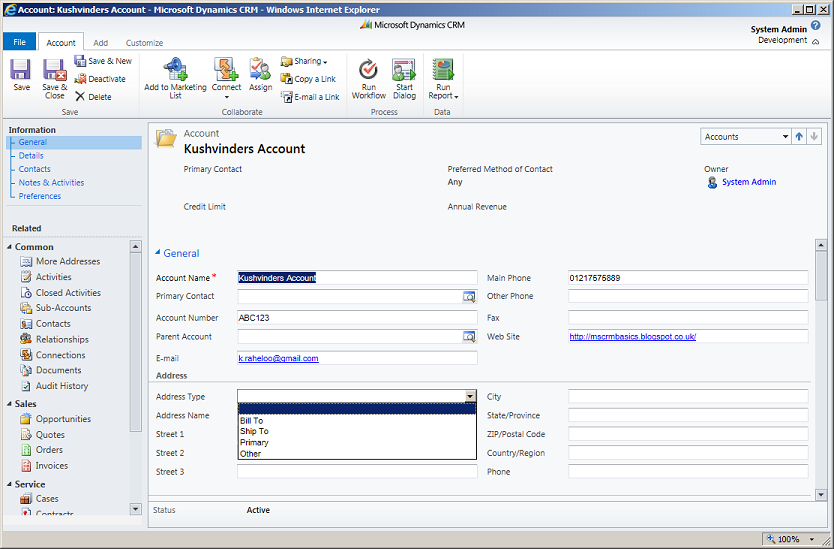
By default on the account entity there are several address fields, and one in particular is the Address Type picklist which is used to categorize the type of address stored for this account. Using this field as an example, the following SQL Query can be used to obtain a list of all options available to that field:


SQL Statement
  1. SELECT
  2. EV.LogicalName as Entity,
  3. ALV.Name as Attribute,
  4. LLV.Label,
  5. APV.Value
  6. FROM LocalizedLabelView as LLV
  7.     INNER JOIN AttributePicklistValueView as APV ON LLV.ObjectId = APV.AttributePicklistValueId
  8.     INNER JOIN OptionSetView as O ON APV.OptionSetId = O.OptionSetId
  9.     INNER JOIN AttributeLogicalView as ALV ON O.OptionSetId = ALV.OptionSetID
  10.     INNER JOIN EntityView as EV ON ALV.EntityId = EV.EntityId
  11. WHERE
  12.     ALV.Name like '%address1_addresstypecode%' AND EV.LogicalName = 'account'
  13. ORDER BY EV.LogicalName, ALV.Name, APV.Value

SQL Results


Enjoy :)

Sunday, 17 March 2013

Portal Accelerator & Adxstudio - How to force clear Cache?

Caching is an important part of all enterprise applications, they help deliver high-performance and scalability. 

For those of you that do not understand caching, in short the caching manager will cache objects in memory the first time they are requested, and reuse these to feed further requests. 

Both Microsoft Portal Accelerator and AdxStudio Portal use caching. Cache invalidation seems to be an issue that many are currently experiencing. There are some built in features such as the Web Notification URL in CRM, but recently I was asked if there was a method of forcing the cache to clear programmatically.

How to clear the Cache Example
  1.         /// <summary>
  2.         /// Removes all items, clears everything from the Cache
  3.         /// </summary>
  4.         public void ClearCache()
  5.         {
  6.             var cache = Microsoft.Xrm.Client.Caching.ObjectCacheManager.GetInstance(null);
  7.             Microsoft.Xrm.Client.Caching.ObjectCacheManager.Clear(cache);
  8.         }
  9.  
  10.         /// <summary>
  11.         /// Removes an item from the cache
  12.         /// </summary>
  13.         /// <param name="item"></param>
  14.         public void ClearCache(string item)
  15.         {
  16.             var cache = Microsoft.Xrm.Client.Caching.ObjectCacheManager.GetInstance(null);
  17.             cache.Remove(item);
  18.         }

Saturday, 16 March 2013

CRM 2011 - How to use Wait/Timeout in Workflows?

One of the great benefits of Microsoft Dynamics CRM, is that is has built-in support for creating Workflows. Creating a workflow involves defining a sequence of steps that describes what the workflow process should do, and when it should do it.

Often you will need to pause the execution of a workflow until a specific condition is met. To achieve this you will want to use a Wait Condition, which can be broken down into the following:
  1. Wait - use this to wait until a condition is met, examples of this could be when a Record Status changes, a field is updated or a value on a related Record is changed
  2. Timeout - use this to wait until a specific date, a period of time or a date relative to a field in a record e.g. 5 days after the Record Created Date
Example Background
We want to use Workflows to create a phone call activity so that someone from our sales department can follow up on newly created leads. When a user completes the activity we want to track if the lead has been contacted. If the lead has not been contacted within 7 days, we want to re-assign the lead to the 2nd line Sales team. 

For simplicity we will create two workflows to achieve this.

Wait in a Workflow
When a lead is created, it will trigger a workflow to create an associated Phone Call activity and wait until the activity is complete, once complete the workflow will update the "Status Reason" field on the Lead as "Contacted".

Timeout in a Workflow
When a lead is created, the Workflow will pause for exactly 7 days from when the Lead was created, when the timeout is reached the workflow will check if the Lead's "Status Reason" field is set to "New", if yes then the Lead will be re-assigned to the "Sales 2nd Line" Team.

Hopefully Wait and Timeouts now make a little more practical sense.

Friday, 8 March 2013

CRM 2011 - How to create a Custom Workflow Activity?

When working with Microsoft Dynamics CRM, one of the most common tasks undertaken is to map real life business processes and to automate these within CRM. There are two main methods of creating processes that are triggered based on input or an event.
  1. Plugins are the most popular choice for C# developers who are familiar with Visual Studio and the CRM Sdk. 
  2. Workflows are another useful feature for creating asynchronous processes, which give none-programmers the ability to create simple but powerful components that do not require a software developer. 
The out-of-box Workflow functionality is somewhat limited, you are constrained by the features exposed by the Workflow creation wizard. 

Custom Workflow Activities
Can be used to enhance and provide solutions to functionality you currently cannot achieve solely by a CRM Workflow. Custom WF Activities are a perfect approach to creating reusable pieces of functionality that can be used by both Workflows and Dialog's.

They do however require programming knowledge such as C# .NET.

How to create a Custom Workflow Activity

Background
To help demonstrate the use of Custom Workflow Activities, the scenario is that when a new Contact record is created, you want the Parent Customer Account's marketing opt in/out values to be applied to the contact.

Solution
1. Open Visual Studio 2010 
2. Create a new Project using the Workflow > Activity Library template


3. Delete the .xaml file, as you will not need this
4. Add a new Class to the project, this will be your Custom Workflow


5. Add the following code to your Class
  1. public class MyCustomWFActivity : CodeActivity
  2. {
  3.     public MyCustomWFActivity()
  4.     {
  5.         
  6.     }
  7.  
  8.     [Input("Parent Account")]
  9.     [ReferenceTarget("account")]
  10.     public InArgument<EntityReference> ParentAccount { get; set; }
  11.  
  12.     [Output("Email")]
  13.     [DefaultAttribute("true")]
  14.     public OutArgument<bool> Email { get; set; }
  15.  
  16.     [Output("Phone")]
  17.     [DefaultAttribute("true")]
  18.     public OutArgument<bool> Phone { get; set; }
  19.  
  20.     [Output("Fax")]
  21.     [DefaultAttribute("true")]
  22.     public OutArgument<bool> Fax { get; set; }
  23.  
  24.     [Output("Mail")]
  25.     [DefaultAttribute("true")]
  26.     public OutArgument<bool> Mail { get; set; }
  27.  
  28.     [Output("Bulk Email")]
  29.     [DefaultAttribute("true")]
  30.     public OutArgument<bool> BulkEmail { get; set; }
  31.  
  32.     protected override void Execute(CodeActivityContext context)
  33.     {
  34.         try
  35.         {
  36.             //-----------------------------------
  37.             // Workflow Context & Service Objects
  38.             //-----------------------------------
  39.             IWorkflowContext wfContext =
  40.                 context.GetExtension<IWorkflowContext>();
  41.             IOrganizationServiceFactory serviceFactory =
  42.                 context.GetExtension<IOrganizationServiceFactory>();
  43.             IOrganizationService service =
  44.                 serviceFactory.CreateOrganizationService(wfContext.InitiatingUserId);
  45.  
  46.             //--------------------------
  47.             // Obtain the Input Argument
  48.             // Account EntityReference
  49.             //--------------------------
  50.             var parentAccountRef = ParentAccount.Get<EntityReference>(context);
  51.  
  52.             //---------------------------
  53.             // Retrieve the Account based
  54.             // on the EntityReference Id
  55.             //---------------------------
  56.             Entity account =
  57.                 service.Retrieve(parentAccountRef.LogicalName,
  58.                 parentAccountRef.Id,
  59.                 new Microsoft.Xrm.Sdk.Query.ColumnSet(true));
  60.  
  61.             if (account != null)
  62.             {
  63.                 //---------------------------
  64.                 // Set Output Argument Values
  65.                 //---------------------------
  66.                 this.Email.Set(context, ((bool)account.Attributes["donotemail"]));
  67.                 this.BulkEmail.Set(context, ((bool)account.Attributes["donotbulkemail"]));
  68.                 this.Phone.Set(context, ((bool)account.Attributes["donotphone"]));
  69.                 this.Mail.Set(context, ((bool)account.Attributes["donotpostalmail"]));
  70.                 this.Fax.Set(context, ((bool)account.Attributes["donotfax"]));
  71.             }
  72.         }
  73.         catch (SoapException se)
  74.         {
  75.             //Log Errors
  76.         }
  77.         catch (Exception ex)
  78.         {
  79.             //Log Errors
  80.         }
  81.     }
  82. }

  • Workflow Activity Class will inherit CodeActivity
  • InArguments - define the input parameters that are passed in
  • OutArguments - define output parameters, these are passed back to the calling process
  • Both In and Out Arguments can have default values, a good way to ensure that parameters are not left empty

6. Right click on the Project, select Properties and create a strong name key file. Similar to plugins, custom workflow activities need to be signed.

7. We need to register the assembly, this will be done using the plugin registration tool as follows:


8. Now that we have the assembly registered, we can create a Workflow to consume the functionality we have defined in our custom activity.

9. To create a workflow, follow these steps:


10. We want this workflow to execute on create for the Contact entity, select Contact from the entity drop-down and enter in a process name.


11. First thing we want this workflow to do, is execute our Custom Activity. We have registered the assembly earlier using the Plugin Registration Tool, it should automatically appear in the Add Step drop-down.


12. Click on the Set Properties button


13. Here we need to provide an input value for the InArgument we defined in our Custom Activity. This value needs to be dynamically set at run-time, so we select the Parent Customer field from the Form Assistant.


14. Next we want to add an Update Record step, to update the Contact record


15. Scroll down to the Preferences section and select each of the marketing fields and using the Form Assistant, select the corresponding value for each field.


16. Add a Stop Workflow step, set it to Succeeded.


17. Make sure you have selected the "Record is created" checkbox, this will ensure that the workflow will only execute when a new Contact is created. Then Save and Close.


18. The workflows needs to be activated, select the newly created workflow and click on the Activate button. On the popup window, click on the OK button.


19. Open a Account record, change some of the marketing fields and save the record.


20. Create a new Contact record, and select the previously edited Account record. Now Save and Close.


21. Re-open the newly created Contact and you will notice that the marketing fields on the Contact record now match those from the Parent Account.


That's it, hope you enjoyed the article :)

Action Microsoft.Crm.Setup.Common.Analyzer +CollectAction failed. Fatal error during installation

When installing the Srs Data Connection (Microsoft Dynamics CRM Reporting Extensions), you may have experienced the following error: ...